
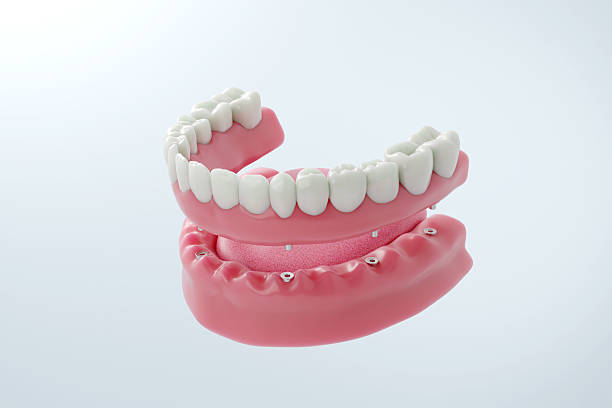
A fixed full-arch bridge depends on where its implants sit across the jaw, not only on how many are used. Full-arch implant distribution describes that arrangement. It shapes full-arch implant stability by affecting how the bridge is supported and how chewing forces travel through it.
Think of a long shelf mounted on a wall. Brackets bunched in the middle leave the ends without support. Brackets spaced with care hold the whole shelf more evenly. Dental implants are more complex than shelf brackets because bone, gums, and your bite all play a role. The basic idea still holds: placement matters.
For patients exploring dental implants in Asheville, NC, implant placement helps explain why two treatment plans can look so different. At Highsmith Dental in Clyde, Dr. John Highsmith plans full-arch dental implants through the Secure Smile approach. Each plan weighs bone, bite, and the final teeth together.
Full-arch implant distribution is the way implants are arranged across the dental arch. It includes where each implant sits relative to the others and to the final teeth. Distribution and implant count are separate decisions, but dentists plan them together.
Two treatment plans can use the same number of implants and still differ greatly. In one plan, the implants may cluster near the front of the jaw. In another, they may spread from front to back.
That difference changes how the bridge is designed. It also changes how biting forces pass from the teeth into the implants and bone.
Secure Smile treatment at Highsmith Dental uses more than four implants on an arch. Even so, where those implants go still shapes how well the bridge is supported. Count and position work as a team.
A full-arch bridge runs from one side of the mouth to the other. It needs support along its working length, from the front biting teeth to the back chewing teeth.
Front implants help support the visible teeth, while back implants support the chewing surfaces. Because every jaw is shaped differently, no single layout fits every patient.
A fixed hybrid bridge links several implants into one rigid, implant-supported unit. When you bite, the bridge shares the load among its supports.
This connection mainly affects mechanical stability, meaning how well the bridge and its parts hold up during use. Biological stability, or how well each implant bonds with bone, depends on other factors covered later in this guide.
Anterior-posterior spread, often called AP spread, is the front-to-back distance covered by implant support along the arch. It helps dentists judge how much support the bridge has and how far replacement teeth can extend past the last implant.
Picture one line across the front-most implants and another across the back-most implants. The distance between those lines is the AP spread.
The front-most and back-most implants mark the outer edges of support. When they sit farther apart, the bridge rests on a broader base. A broader base can help the bridge resist tipping and bending forces.
More spread is not always better, though. Moving an implant farther back may bring it near a sinus or nerve, or into bone that is too thin. The goal is a spread that fits your anatomy.
Back teeth do much of the heavy chewing. Supporting them depends on where implants can safely go in the back of the jaw. Four factors connect closely:
AP spread describes the overall support pattern across the arch. The distance between two neighboring implants is a separate, local measurement.
Neighboring implants need enough room for healthy bone and gum tissue between them. They also need space for restorative parts and cleaning tools. A good plan balances overall spread with adequate spacing between each pair.
In some designs, yes. A favorable front-to-back spread can help limit how far replacement teeth extend past the last implant. Shorter extensions generally create less leverage on the bridge.
Still, no single ratio applies to every patient. Bone, bite strength, materials, and the opposing teeth all affect the design. Wider distribution is a helpful tool, not a guarantee against complications.
A cantilever is a section of the bridge that extends past the last supporting implant. Many full-arch bridges include short cantilevers at the back. Because these teeth have no implant directly beneath them, their length and design need careful planning.
Picture a bridge whose last implant sits under a premolar. If the bridge also includes a molar behind it, that molar is a cantilever. It attaches to the bridge but has no implant underneath. This design is common and can help restore chewing function.
A diving board offers a simple comparison. Pressure at the far end creates more bending at the base than pressure near the base. Cantilevers behave similarly.
Chewing on a long extension increases leverage on the framework, screws, and nearby implants. Over time, this may raise the risk of loosened screws or damaged components. That does not make every cantilever unsafe, but length and design deserve close attention.
Dentists can adjust the bridge to keep cantilever forces reasonable. Options may include a shorter extension, slightly narrower back teeth, or changes to how upper and lower teeth meet.
This connection mainly affects mechanical stability, meaning how well the bridge and its parts hold up during use. Biological stability, or how well each implant bonds with bone, depends on other factors covered later in this guide.
No single factor decides how long a cantilever can be. Dentists weigh several features together:
A change in one factor can change how the others are planned.
A full-arch bridge handles repeated forces from chewing, speaking, and habits like clenching. Implant distribution affects how those forces spread through the bridge and into the bone. Well-distributed support helps share the load instead of concentrating it in one area.
Vertical forces push straight down along the implant, like biting into a sandwich. Lateral forces push from the side, such as when your jaw slides while chewing.
Natural teeth sit in a periodontal ligament, a thin cushion of fibers around each root. This cushion absorbs some shock and helps you sense pressure. Implants bond directly to bone and lack this cushion. They can handle side forces, but planning aims to direct most forces in favorable ways.
The molar region carries some of the strongest chewing forces in the mouth. In a full-arch bridge, those teeth often sit near the last implant or on a cantilever. That is why dentists pay close attention to back implant positions, extension length, and how the back teeth meet.
Clenching and grinding, known as bruxism, can place heavy force on teeth, often during sleep. On a full-arch bridge, this may increase stress on materials and components.
For patients who grind, the plan may change. The dentist may adjust bridge thickness, material choice, or bite contacts, or recommend a night guard. More frequent checks of the bridge and its components may also help. Grinding does not automatically mean a patient needs more implants.
The way upper and lower teeth meet affects how force travels through the bridge. Bite planning looks at:
For more detail on bite mechanics, read about how bite forces affect dental implants.
Implants need enough healthy bone to bond with, and they must avoid structures like sinuses and nerves. They also need to sit where they can support the planned teeth. Good placement meets both the biological and structural requirements at once.
Bone height is how tall the bone is. Bone width is how thick it is from cheek to tongue. Density describes how firm the bone is inside.
All three affect where an implant can go. Thin or soft areas may not suit an implant without extra steps. In some cases, a bone graft or a different implant position may be considered. You can read more about bone support for dental implants and why quality matters.
The maxillary sinuses are air spaces above the upper back teeth. After back teeth are lost, the bone beneath the sinuses often becomes shorter.
This can limit how far back implants can go. One planning strategy angles a back implant along the sinus wall. That approach does not suit every patient. Bone quality also differs between the arches, and our guide explains how upper and lower jaw implant planning differs.
The lower jaw contains the inferior alveolar nerve. It runs through the jawbone and gives sensation to the lower lip, chin, and teeth.
Implants must stay a safe distance from this nerve. After bone loss, the nerve may sit closer to the top of the bone. This can limit how far back implants go and influence their angle or length.
When a tooth is lost, the bone that held it no longer gets the same stimulation. Over time, the ridge can shrink in height and width. This is called bone resorption or ridge remodeling.
A person who lost teeth recently may have very different bone from someone who has worn dentures for years. That is one reason full-arch plans vary so much.
Angled implants are a planning option, not a shortcut. Tilting selected back implants can help a dentist use available bone while avoiding sinuses or nerves. It can also move support farther back. Whether angulation fits depends on each patient’s anatomy.
Sometimes the best remaining bone sits at an angle. Tilting a back implant can let it anchor in that bone while staying clear of nearby structures.
The All-on-4 concept is one well-known example that pairs straight front implants with angled back implants. Other full-arch plans use angulation differently, or not at all.
An angled implant does not point straight up toward the bridge. Multi-unit abutments solve this. These connectors attach to each implant and correct the angle.
They also line up several implants so one connected bridge can seat evenly on all of them.
A long-term review comparing angled and straight implants found similar survival and success rates after more than five years of function. Even so, neither orientation is better in every case. Results depend on the full treatment plan, including anatomy, implant design, loading, and maintenance.
Implant positions and bridge design depend on each other. Implants are placed to support the teeth you will actually wear, and the bridge is built to fit those implants precisely. When both are planned together, the bridge can spread forces more evenly.
This approach is called restoration-driven planning. The dentist first maps where the new teeth should sit for a good bite, a natural smile, and easy cleaning. Then the dentist chooses implant positions and sizes to support that design.
Placing implants only where bone is easiest to reach can leave parts of the bridge poorly supported.
A full-arch bridge should seat on its implants without forcing or straining any of them. This is called passive fit.
An accurate fit helps spread forces evenly across the implants. A poor fit can stress screws and components over time. That is why precise records and lab work matter.
Secure Smile bridges are made from Prettau zirconia, a durable material with natural-looking color and translucency. Even so, a strong material still needs proper thickness, accurate fit, a balanced bite, and well-placed implants underneath.
Implant positions influence the bridge’s shape where it meets the gums. Contours that trap food or block cleaning tools make daily hygiene harder.
Good planning leaves room for water flossers, special floss, and small brushes. It also lets your dental team clean and check each implant during visits.
3D imaging shows the jawbone, sinuses, and nerves in detail before treatment. It helps the dentist see where implants can fit and how they relate to the planned teeth. It reduces guesswork, while clinical findings still guide the final plan.
Standard dental X-rays show a flat image. A cone-beam CT (CBCT) scan creates a 3D view of the jaw. According to the FDA, dental professionals use CBCT for purposes that include dental implant planning.
The scan helps measure bone and locate the sinuses and nerve. Highsmith Dental provides 3D dental implant imaging with an in-office CT scanner.
Imaging becomes more useful when combined with the restorative plan. At Highsmith Dental, CT results are imported into software that allows virtual implant placement on a 3D image of the bone.
This lets the dentist compare possible implant positions against the planned teeth before surgery. Exams, bite records, and photos add details a scan cannot show.
Imaging and a clinical exam guide treatment, but neither can predict everything. During surgery, the dentist may find bone that is softer or thinner than expected.
When that happens, an implant may be placed at a slightly different angle or position. These adjustments aim to protect long-term stability.
Good distribution is an important mechanical factor, but it does not guarantee longevity. A bridge’s lifespan also depends on bone health, gum health, bite forces, materials, home care, and regular checkups. Distribution is one piece of a larger plan.
Biological stability depends on osseointegration, the process where bone bonds to the implant surface. It also depends on healthy tissue around each implant.
Mechanical stability refers to the bridge and its parts. An implant can be well bonded while a screw loosens. A bridge can stay intact while gums become inflamed. Both need attention.
The answer depends on which implant is affected, how much support remains, the bridge design, and the diagnosis.
Some problems can be treated while keeping the bridge. Others may require a new implant or changes to the bridge. The remaining implants may not automatically make up the difference, so a careful evaluation guides the next step.
Full-arch implants need ongoing care. Regular visits allow your dental team to:
Both matter, and they are planned together. More implants do not automatically create a stronger bridge if they are poorly placed. Placement determines how well the support spreads across the arch.
Angling a back implant can help it anchor in available bone while avoiding the sinuses or a nerve. It may also move support farther back. Angulation depends on anatomy and is not needed for every patient.
Anterior-posterior spread is the front-to-back distance between the front-most and back-most implants in an arch. It shows how broad the bridge’s support base is. Dentists use it to plan how far replacement teeth can extend past the last implant.
No. Cantilevers are common in full-arch bridges and can work well when carefully designed. Longer extensions add leverage, so dentists plan their length around implant positions, bite forces, and materials.
It can play a role. Unfavorable positioning can contribute to worn components, fractures, or areas that are hard to clean. Outcomes still depend on many factors, including bone health, gum health, bite forces, and maintenance.
Often, yes. The upper jaw has sinuses and usually softer bone. The lower jaw has a nerve running through it and typically denser bone. Each arch also bites against different opposing teeth, which affects how forces are planned. These differences shape implant angle and position in each arch.
Bone availability matters, but it is only part of the decision. An implant in thick bone still needs to support the planned teeth in a useful position. Dentists balance bone, anatomy, and bridge design.
Dentists combine a clinical exam, 3D imaging, bite analysis, and restorative planning. They also review health history and habits like grinding. For patients seeking dental implants in Asheville, NC, this approach creates a plan built around each person’s needs.
Full-arch implant stability starts with a plan built around your bone, your bite, and the teeth you want. No single configuration suits everyone.
At Highsmith Dental, Dr. John Highsmith evaluates bone support, implant positions, bite needs, and restorative goals before recommending Secure Smile treatment. Our office in Clyde, NC 28721, welcomes patients from Asheville and across Western North Carolina.
If you are considering full-arch dental implants in Clyde, NC, schedule a full-arch implant consultation to talk through your options with our team.
